How to Set a Proxy Server in Firefox
Step 1: Setup Proxy Server in Firefox
In Firefox, click the Firefox button on the top-left. Then, click Options.

Step 2: Setup Proxy Server in Firefox
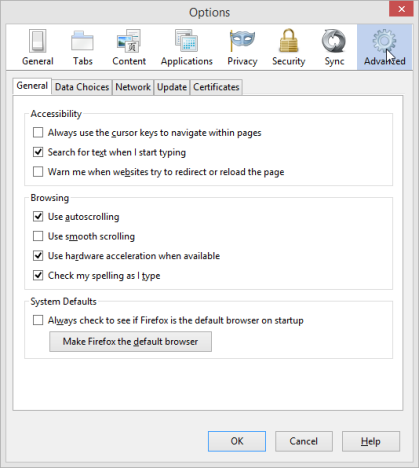
The Options window is opened. Click the Advanced section.

Step 3: Setup Proxy Server in Firefox
Here you will find several tabs. Click Network and then Settings.

Step 4: Setup Proxy Server in Firefox
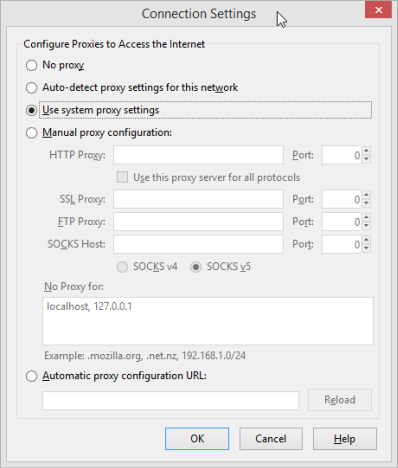
The Connection Settings window is opened. Here you can set how Firefox connects to the Internet and whether it uses a proxy or not. One thing you will notice immediately is that, unlike most browsers, Firefox offers plenty of customization options related to proxy servers:
- "No proxy" - when enabled, Firefox will not use a proxy server to connect to the Internet.
- "Auto-detect proxy settings for this network" - Firefox tries to detect whether a proxy is required to use the Internet on the network you are connected to. Depending on what it learns, it will set itself to use a proxy or not. I have tried this setting in a couple of business networks and it didn't work well.
- "Use system proxy settings" - when enabled, Firefox will use the same proxy settings as Internet Explorer.
- "Manual proxy configuration" - when enabled, you can type the IP address and port of the proxy you want to use. Unlike other browsers, Firefox allows you to set different proxy servers and ports for different kinds of traffic, like HTTP, SSL, FTP and so on. If you don't want to use a proxy server for specific network addresses, you can add them separated by a comma (,) in the "No proxy for" text box.
- "Automatic proxy configuration URL" - when enabled, you can type the URL of the proxy server you want to use.

To save your settings, click OK.
